Saturday, December 12, 2015

UFO (UnFinished Object) + sketch challenge

Today I was doubly inspired by both Shopping Our Stash's UFO challenge (UnFinished Object) and this wonderful Leslie Hanna sketch (The Crooked Stamper sketch challenge #11):
This umbrella was cut and assembled in April 2012 using My Mind's Eye Miss Caroline Dilly Dally papers.  At that time, since I Cricut cut the umbrella panels from three different patterned papers, I decided to go ahead and cut three umbrellas total.  So back in April 2012 I made one card and used a 3D sticker sentiment from a My Mind's Eye Lost and Found 2 collection.  At the time there were no other sticker sentiments that would work for the remaining two umbrellas, so the other two went in my UFO heap…until now.

The owner of the local coffee shop where I sell some of my cards is having a baby girl.  Several of the regular customers asked me recently to create baby girl cards.  I responded that there are a few baby girl cards for sale and they responded,"but they don't say 'baby shower'."  Sometimes customer requests truly surprise me; but it made an easy decision as to what sentiment to use with the last two umbrellas!

Thank you,  The Crooked Stamper sketch and Shopping Our Stash, for the inspiration.  I may have to make working on my UFO pile as a New Year's resolution :)

Happy Saturday!

Tuesday, December 8, 2015

UFO challenge (UnFinished Object)

My self-challenge this year has been "use-it-up".  Last Spring I purged my craft room and filled the trunk of my SUV with papers, stamps, etc. that no longer brought me joy.  I carried them off to a donation center and I felt so much lighter, even if my family could not tell that my craft room was less jam-packed-full of crafty stash.  (When my husband saw the trunk of my car he exclaimed, "All of that came out of there?")

I have accumulated new stash, but I still think I am doing okay…with the exception of the pile (mini tower?) of unfinished cards and projects on the floor that I uncovered in the spring clean out.  I have added a couple of UFOs to it in the past few months.  I actually have made 5 cards from that pile, but that has hardly made a dent in it.  I wish the pile wasn't there at all (I am a neat freak), but that may take most of 2016 if I didn't have other things to make :)

This was on the top of the pile:
In October I purchased the MFT quilt die (it had been back-ordered for months.)  I still love these old Daisy D's paper (circa 2005.)  In an attempt to use up the entire set of papers, I started die cutting.  Two days of work yielded these six panels…it takes longer than you might think to die cut and adhere all of those pieces.  I even used my Xyron to make it go quicker than say a glue pen.  I wasn't sure what sentiment I might use…"Just a Note" or "Thinking of You" but I wasn't sure.  Life got busy, so they went into this gallon Ziploc.

This morning when I saw the "UFO challenge" at Shopping Our Stash, I perused my mini tower of UFOs.  There are a lot of single unique cards I could make from the pile, but I chose this project because it was bulky.  I decided to only use the red and green papers in the pack(so I didn't quite use-it-up.)  That meant making four more panels to use all of the green papers.  Then I went in search of a sentiment…this one seemed perfect:
Wishing you lots of love this Christmas.

Happy Tuesday!

Sunday, December 6, 2015

No Stamping challenge + Washi wonderful

Shopping Our Stash has a "No Stamping" challenge this fortnight.  I do love to stamp, especially now that I am the proud owner of a MISTI.  My craft room is also full of stash…some from the late 1990s and some brand new.  This year I have been in the "use it up" mode.  When I sit down to create, I do not consciously decide to stamp or not to stamp; in this particular case I was just trying to use my new MFT birthday die and use up this new Pinkfresh Studio washi tape:
Any guesses as to how many cards one roll of washi tape can make?  (Take your time, I will reveal the answer at the end of the post.)

I did *almost* use the entire roll.  There is just enough left that I have kept the roll on my craft desk.  It has come in handy when my daughter was using my Cricut to cut some dies for a school poster project she was working on.  She used bits to tape down the card stock on the cutting mat (I need to wash my cutting mats and re-apply adhesive again.)  The three butterflies are a Stampin' Up! sizzlet die and the star brads were in my really old stash (circa 2000.)

So did you guess correctly?  The answer is (insert drumroll):
14!

Happy Sunday!

Non-traditional Christmas card challenge + Sketch Challenge


I was doubly Lesley/Leslie inspired to play with my December Simon Says Stamp kit and play along with Lesley Croghan's The Challenge "Make a non-traditional Christmas card (no red and green)" and Leslie Hanna's The Crooked Stamper sketch challenge.
Such a pretty inspiration photo.

A wonderful sketch to follow.

Most of my supplies came from the December 2015 Simon Says Stamp card kit.  I made two of these cards, since the kit contains two sheets of each Pinkfresh Studio designer paper.  The only piece from my stash was the aqua card stock; it is Core-dinations color core that I embossed in a herringbone pattern.  I thought this particular pattern would mimic the doodles in the largest tree and the darkest tree too.  It also reminds me of pine needles…but maybe that's just me :)
Happy Sunday!

Friday, December 4, 2015

A fresh look for an old scrap...


Every card has a story…in my mini craft room clean up from a few weeks ago, I came across an ivory card with stamped pears.  The ivory had some ink smudges, so I cut the panel down.  I also stamped "thank you" in a dark green ink that actually matches quite well in real life (it looks almost black in my photo.)  See resized panel below:
I wanted to bring out the green in the pears as well as the frosted shadow pears, and I decided to use my Tim Holtz kraft core card stock.  I thought the kraft core would compliment the orange and copper base card stock.  I embossed the kraft core piece and sanded it with my sanding block…look, so pretty!  Almost a shame to cover it up:

However I needed a quick thank you card for a belated birthday gift I received last weekend, so I added a little banner from my orange color scraps drawer and glued it all together:
Not a bad up cycle if I do say so myself :)

Happy Friday!

Thursday, December 3, 2015

No Stamping challenge at SOS

 There is a "No Stamping" challenge at Shopping Our Stash challenge blog, so I chose some pretty patterned papers, a few dies, and hand drawn doodles to create this birthday card.

All of my supplies came from the August Simon Says Stamp kit.  I loved the colors and papers in this kit, but I had difficulty making anything come together.  Once I made this first card, I used the same basic design to do a little mass production…sort of…each card is unique, but the patterns and colors change.  The cards below each have stamped sentiments, so they do not meet the "No Stamping" challenge; just the card above has no stamping.
 The middle card in this trio is a CASE of Shari Carroll…isn't she amazing?
The last four cards seemed a little plain, so I added a few wood veneer stars.

I hope you join me in the fun at S.O.S. (Shopping Our Stash)…remember, no stamping on this particular challenge.

Happy Thursday!

Monday, November 16, 2015

Holiday Food and Drinks challenge at Jingle Belles

be jolly   *   be merry   *   spread cheer


I have a sheet of SRM Stickers that has 12 Gingerbread men, 12 "Holiday Cheer!" sentiments, and 12 "be jolly * be merry * spread cheer" sentiments.  When I saw this challenge theme at Jingle Belles, I knew I had to try to make a set of 12 cards using the entire sheet of SRM stickers.  (I am just now starting to make Christmas cards…yikes.  New Year's resolution:  keep up with Jingle Belles challenges in 2016!)

I perused my papers and found that these Doodlebug papers went nicely with the gingerbread man's scarf.

Happy Monday!

Sunday, November 15, 2015

Thanksgiving gift, 6x6/12x12 Organizational Tips, Teacher Treats, and a Crooked Stamper Sketch challenge


My Big Shot broke again, and my wonderful dhDH (dear husband Doug Houck) fixed it for the fourth time.  He gave me permission to buy a new one if it happens again.  Meanwhile, I decided it was time to re-organize some of my 12x12 and 6x6 collections.  After all, there is no way one can live without a Big Shot, right?  I had to find something creative to do...

Organizational tip:  (6x6 papers sorted by color)
I took my really thin 12x12 collections (some actually had no 12x12, some had maybe two sheets) and cut them down to 6x6.  I also took some of my really thin 6x6 pads and threw away the front and back covers of the pads and re-organized all of these papers by color with the cut down 12x12.  I also sorted 6x6 papers from retired card kits in there too.  Many of my 6x6 were double-sided; I had to decide which side I liked best and filed it that way.  In a couple of cases where I loved both sides, I filed each piece under two different colors.  Make sense?
I created dividers with colored card stock cut to 6x7; red, pink, green, yellow, blue, orange, black, grey, kraft, and beige.  I made a decision to put all aqua papers in the blue section.
I also chose to make a few other categories:  text, gingham, multi-colored stripes/dots/chevrons, music, scenic (e.g. hot air balloons, clouds, bikes, maps), colorful florals, and school/office (e.g. grid/graph papers, typewriters, numbers).

This was a lot of work, but I wasn't really using those paper scraps and old collections anyway.  I am anxious to see if it was worth the hours I spent organizing.

I have thought of doing this for about 5 years now, and I fought it because I enjoy working within a collection since the patterns are already color-coordinated.
I wanted to play along with Leslie's sketch, and I gotta say I threw this pie card together in less than 30 minutes.  My pie and cutting board die cuts and sentiment came from the November Simon Says Stamp card kit.  I knew I wanted red gingham paper, so I went right to my newly organized 6x6 to the gingham section.  Score!  The new system is working already…of course I had a great sketch as motivation.  I added some MME burlap ribbon and frayed both ends a bit.  Done.

Every year right before Thanksgiving our realtor gives us a gift certificate for a pie at a local pie shop.  This card is for her.  Perfect, right?

I came across some ancient 12x12 in autumnal colors, so I decided to make some "Happy Thanksgiving" teacher treats with peppermint patties.
 Here is the front and the back:
I am probably the only parent that does little treats throughout the school year, but I am sure other parents help in other ways.  This is what I choose to do.  I like to let them know they are appreciated and I love using my stash.

Happy Sunday!

Saturday, November 14, 2015

A Christmas Colour challenge

The Challenge is having a Christmas color challenge this week.  Last year I made ornaments for my sister for Christmas using some of these MME chipboard houses (Winter Wonderland collection.)  I had three left over, so I wanted to use them up.  I created a trio of 3x3 cards to pair with neighbor gifts.
I thought that burlap paper with the white polka dots looked like snow.  I fringed the edges a bit for additional texture.  The metal charms are Making Memories.

 The houses also have green, aqua, or a bit of yellow, so if this disqualifies me, I totally understand!

Thanks to The Challenge for the inspiration to use my stash.

Happy Saturday!

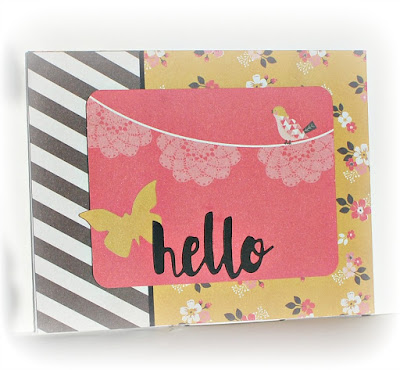
Hello…is it me you're looking for?

 I used my Simon Says Stamp "hello" die and these pretty MME papers with difficult-to-photograph gold for the current challenge at Cut It Up:  Inspired by a book, movie or song.  Lionel Richie is singing "Hello" in my head…and now yours too, right?  You're welcome!
This one says, "dream imagine create."  I'm hearing John Lennon's "Imagine" in my head…card design inspired by Lucy Abrams.

Below are even more cards that I created using my October card kit from Simon Says Stamp (not necessarily inspired by a book, movie, or song):


 Inspired by Nichol Magourik.
 Inspired by Wanda Guess.
 Inspired by Sarah Moerman.
 Inspired by Sarah Moerman.

Insired by Yana Smakula.

Only nine cards out of this kit so far, but I need to move on and play with my November Simon Says Stamp card kit.  Thank you, Cut It Up for the inspiration!

Happy Saturday!

Wednesday, November 4, 2015

Echo Park stickers + papers = quick cards

My baby girl card stash is low, so I pulled out my Echo Park "Bundle of Joy" 12x12 collection in search of stickers and coordinating papers to create a couple of quick cards.  For the owl card I added machine stitching, and the card below I added sequins.  Quick and easy!

I hope you find these cards inspiring.

Happy Wednesday!

Sunday, October 25, 2015

Masculine/Nautical Cards- Simon Says Stamp July 2015 card kit


A few weeks ago I finally demolished my July card kit.  I am in need of masculine cards, so this was a perfect opportunity to build up my stash.
 This first set of three were inspired by Yana's card (#5 in the Simon Says Stamp gallery.)  I made my own changes, of course!  The red dot strip was left over from my stash, and actually was not part of the kit.  I fussy cut the life preservers and popped them up.
 These wonderful metal anchors and twine were part of the kit (top two cards.)  They were inspired by Debbie's card (#104 in the SSS kit gallery.)  I loved her life preservers, but I wanted to use those anchors.  The bottom two cards were inspired by scraps and the pretty patterned paper in the corner of one of the 6x6 papers (both white tags.)
 The top left card (actually there are two there) was inspired by that pretty paisley paper and how wonderfully it coordinates with that aqua card stock (also in the kit).  The other three were inspired by scraps.  (The navy paper with stars on the bottom two cards actually came from my Echo Park 6x6 Scoot pad.)
And my final use of scraps…I added these two buttons from my stash.  Fourteen cards in all!

For the past few weeks when I have had time to create I have alternately been playing with the August, September, and October kits.  I have made several cards from each kit so far, but not quite demolished any one kit yet.  Hopefully this post may inspire another Simon Says Stamp card kit fan or someone who owns Authentique's Seaside papers.

Happy Sunday!

Tuesday, October 20, 2015

SPOOK-tacular teacher treats/Using 6x6 no scraps TUTORIAL

If you know me well, you know I make use of scraps that most (normal) people toss in the bin.  I designed this tag to not have ANY pretty paper scraps.

For these pocket tags (I made 28 total) I needed a little more than half of a 6x6 pad of paper (Echo Park Apothecary Emporium), I used up two rolls of ribbon (and then used ribbons from my scrap bin to complete), Doodlebug twine, and SRM stickers.

I also love making little treats for teachers, but since my two children have so many teachers, teacher assistants, and therapists, there are a lot of people to recognize.  In order to keep my spending costs down, I am challenging myself to use my craft room stash and not purchase anything new for the entire school year.

I created 27 trail mix packages at the start of school, and all I purchased was one large bag of trail mix.  This time I purchased only one Hershey snack-size bag of candy…everything else came from my stash!

Tutorial:

  • Cut black card stock at 7 1/4" x 3 1/4".  (I got three out of a sheet of 8 1/2" x 11"…yes, there will be scraps.)
  • Scallop the short end using a border punch.
  • Notch the other two corners to look like a tag (I used a Stampin' Up! corner punch.)
  • To create the "pocket" score at 2 1/4" from the scalloped end.


Decorate:  I used 6x6 paper, leaving no scraps (*almost*)

  • Cut a 3"x3" square from patterned paper, notching to top corners.  Adhere to black card stock. *I got exactly four from a sheet of 6x6…no scraps!
  • Using strong adhesive, tape up the two sides to create your pocket.
  • Cut a 2"x3" rectangle from a coordinating patterned paper to decorate the pocket.  Adhere to outside of pocket.*I got exactly six from a sheet of 6x6…no scraps!
  • Embellish as desired.*I used some extra to punch circles for the stickers, so I did crete a few scraps
Happy Tuesday!

Thursday, October 8, 2015

The Challenge - A Sketch!

You're pretty fantastic
 It's been a while since I have been in bloggie-land.  I have still been creating, just not able to take the time to take pictures and post.  I was looking for some inspiration to play with the triangles and floral background paper strips/scraps, and then I saw Lesley's sketch:
I took some liberties with the sketch, but the elements are there; my middle strip is just really skinny and the circle element is my die cut journaling card.
 I also made it into an easel card!
I hope you are inspired as I was…there is still time to play along at The Challenge.  Link up by Sunday!

Happy Thursday!

Wednesday, September 9, 2015

Happy Trails Teacher Gifts

 Last week my twin girls started 8th grade.  There are more teachers, teacher assistants, and other personnel than in elementary school.  I've given a few bags away to the bus drivers and the bus driver assistants, but here is what I will take to school today:
I made 27 in all.  I did make an extra in case I forgot someone!

When I was teaching I had so many parents who were wonderfully supportive and thoughtful, and it is my turn to pay it forward for my children's teachers.

I used up these fun K&Co. 3D leaf/tree stickers that I purchased years ago.  I just had to have them, but I don't think I ever used them.  And there were exactly 27, so they were meant to be on this project to hide one of the staples.  My Cricut Campin' Critters die covers the other staple (cut at 3.25").  I used snack-size Ziploc baggies.  I also used up some really old stash of Sharon Ann papers (from Michaels) for the toppers (cut @6.5"x5").

Now to plan for the Halloween gifts...any ideas?

Happy Wednesday!

Friday, September 4, 2015

Sports Die Cut Challenge @ Cut It Up

Echo Park's "Lucky You" isn't just for St. Patrick's Day projects!  I really like it as the background for this soccer layout I made for my friend.  (Her daughter is #12!)

I Cricut cut an 11" circle in white card stock, then the 11" layer in black card stock.  I moved the pictures underneath to figure out the placement I wanted.  Then I placed the black hexagon cut out pieces back in.  I picked up one hexagon piece and photo…careful not to move the position of the photo, and trimmed the photo to the hexagon shape.

This ties in perfectly for the current challenge at Cut It Up: Sports
 Enter your sports-themed card, layout, or project by September 16th at Cut It Up for a chance to win a $15 gift certificate to One Happy Cut:
Happy Friday!